👋Intro
Recently, I had a requirement to upload a vRO package from one vRO to other. I was very sure that vRO offers the REST APIs to do so and it just the matter of writing a simple JavaScript code to fetch the package, save it in local file system and upload it to other vRO. Clearly, I was not thinking straight. I immediately realized that vRO doesn’t work really well with Multi-Part MIME Type which is what the /packages/ API is using.
I was struggling through it when I found a tweet by Joerg Lew from 2017 where he is uploading a workflow using same Multi-Part MIME type. From what I see in the replies, that code worked. Now I had to make it work with a package. After many attempts and modifications, I failed badly. You can check what I did here.
That was a lot of efforts and I dropped that idea. But I started wondering maybe I can find my answer in Node.js or Python and of course there it is. One thing constantly biting me was whether Polyglot Scripts can access the local filesystem just as JavaScript and clearly, they don’t. Another setback.
In my last attempt, I created a node.js script which was working fine on my local machine but I had to make it work inside vRO. Then, I thought what if I use vRO Polyglot bundles as a local filesystem. It kinda worked for me. However, I had to do a trade-off. The filesystem inside these bundles are read-only. Updating anything from inside would not possible but I can read anything I want. That’s exactly what I did. I created a package in which I kept everything I need on my remote vRO, put it inside the bundle, and uploaded it to vRO. BINGO! After many trails, I managed to somehow fulfill my original requirement which was to upload a package to vRO from vRO.
👣 Process

- Here is the Nodejs script I used in the bundle. Download the bundle “uploadPackageToVro.zip” from here.
/**
 * @description Uploads a .package file to vRO
 *
 * @param {string} vroFqdn
 * @param {string} username
 * @param {string} password
 * @param {string} packageNameWithExtension packagename + ".package"
 *
 * @outputType void
 *
 */
exports.handler = (context, inputs, callback) => {
	const process = require('process');
	const request = require('request');
	const fs = require('fs');
	process.env['NODE_TLS_REJECT_UNAUTHORIZED'] = 0; //throws a warning in vRO log, ignore it.
	console.log('Inputs were ' + JSON.stringify(inputs));
	var options = {
	  'method': 'POST',
	  'url': 'https://'+ inputs.vroFqdn +'/vco/api/packages',
	  'auth': {
			'user': inputs.username,
			'password': inputs.password
		},
	  'headers': {
                // Uncomment this and comment out the auth attribute above
                //'Authorization': 'Basic QWxhZGRpbjpvcGVuIHNlc2FtZQ==', // for vRO Basic Authentication
                //'Authorization: 'Bearer AAAAAAAAAAAAAAAAAAAAAMLheAAAAAAA0%2BuSeid%2BULvsea4JtiGRiSDSJSI%3DEUifiRBkKG5E2XzMDjRfl76ZC9Ub0wnz4XsNiRVBChTYbJcE3F', // for vRA Access Token Authentication
		'Accept': 'application/json' //use json with Bearer token
	  },
	  formData: {
		'file': {
		  'value': fs.createReadStream(inputs.packageNameWithExtension),
		  'options': {
			'filename': inputs.packageNameWithExtension,
			'contentType': null
		  }
		}
	  }
	};
	request(options, function (error, response) {
	  if (error) throw new Error(error);
	  console.log(response.body);
	});
	callback(undefined, {status: "done"});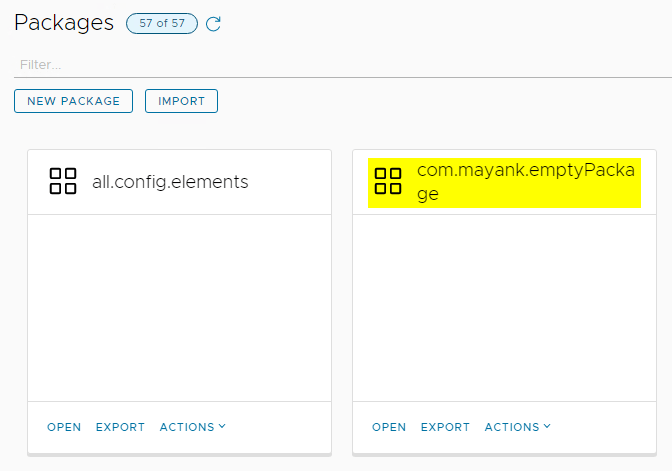
}- Extract the zip and replace the package “com.mayank.emptyPackage” with your custom package and rezip it either using 7-zip or Windows Compressor.
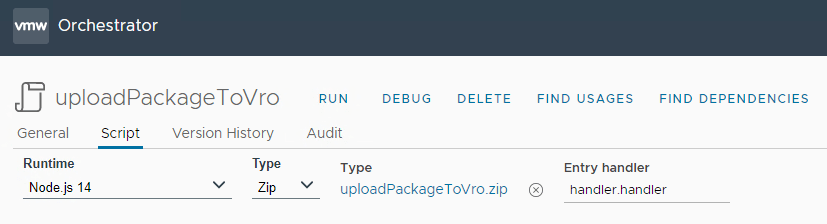
- Create a new action in vRO, Select the Runtime, Type, Entry handler as shown below and Click Import to import the bundle.
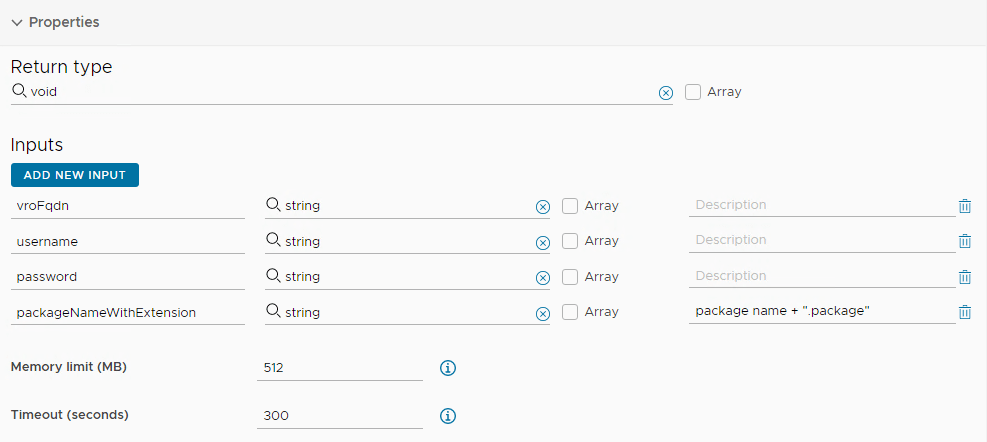
- Add Inputs as shown here as well as set the memory limits and timeout accordingly.
- Run the action and provide input values. packageName should match the package that you have bundled in the zip.

- Once the action is completed, you should see the package in other vRO.
❌ Failed attempts
Below are my initial efforts where I spent a lot of time but didn’t work for me. I am still hopeful though that this code can be improved and should work.
Option 1: Using Simple REST operation
var basicvROUsername = "username@domain";
var basicvROPassword = "pa$$w0rd!";
var vROUrl = "https://"+getvROName()+"/vco/api";
var packageName = "com.mayank.emptyPackage";

//Save package to a file in local filesystem
var vroHost = RESTHostManager.createHost("vROHost");
vroHost.url = vROUrl;
var host = RESTHostManager.createTransientHostFrom(vroHost);
host.authentication = RESTAuthenticationManager.createAuthentication('Basic', ['Shared Session', basicvROUsername, basicvROPassword]);
//System.log(host.authentication);
var url = "/content/packages/" + packageName + "?allowedOperations=vef&exportConfigSecureStringAttributeValues=false&exportConfigurationAttributeValues=true&exportExtensionData=false&exportGlobalTags=true&exportVersionHistory=true";
// vco/api/content/packages/com.mayank.emptyPackage
//System.debug(url);
var request = host.createRequest("GET", url, null);
request.setHeader("Accept-Encoding","gzip, deflate")
request.setHeader("Accept", "application/zip")
request.setHeader("Content-Type", "application/zip;charset=utf-8")
var response = request.execute();
//System.log(response);

if (response.statusCode != 200) { // 200 - HTTP status OK
    System.warn("Request failed with status code " + response.statusCode);
    if(response.statusCode == 401)
        System.warn("User is not authorized. Cannot Proceed!");
} else {
    System.log(response.contentAsString);
    System.log(" >>> Time to save the content as a file");
    var fileDir = System.getTempDirectory();
    var filePath  = fileDir + "/"+packageName +".package";
    System.log(filePath);
    var writer = new FileWriter(filePath);
    writer.open();
    writer.write(response.contentAsString);
    writer.close();

}

//Upload .package file to vRO REST Host
var vroHost2 = RESTHostManager.createHost("vROHost2");
vroHost2.url = vROUrl;
var host2 = RESTHostManager.createTransientHostFrom(vroHost2);
host2.authentication = RESTAuthenticationManager.createAuthentication('Basic', ['Shared Session', basicvROUsername, basicvROPassword]);
var url = "/content/packages";
var myFileReader = new FileReader(filePath);
myFileReader.open();
var fileContent = myFileReader.readAll();
var request = host2.createRequest("POST", url, fileContent);
request.setHeader("Accept", "application/json");
request.setHeader("Content-Type", "multipart/form-data");
var response = request.execute();

System.log(response.contentAsString);
if (response.statusCode != 200) { // 200 - HTTP status OK
    System.warn("Request failed with status code " + response.statusCode);
    if(response.statusCode == 401)
        System.warn("User is not authorized. Cannot Proceed!");
} else {
 System.log("Check if package uploaded");
}

function getvROName(){ //works on 8.x
    var com = new Command(["printenv", "|", "fgrep", "JVM_OPTS"]);
    var res = com.execute(true);
    var output = com.output;
    var nodeName = output.match(/-Dvco.app.hostname=([^\s]+)/)[1];
    return nodeName;
};Option 2: Generating Multi-Part Content line by line
I used Postman code generator to get WebKit strings.
var boundary = System.nextUUID();
var crlf = "\r\n";
var wf_zip_path = filePath;
var packageName = "com.mayank.emptyPackage";
System.log(filePath);
System.log(rest_Host);

//Generate multipart content
// var content = "";
// content += "--" + boundary + crlf;
// content += "Content-Disposition: form-data; name=\"file\"; filename=\"com.mayank.emptyPackage\"" + crlf;
// content += "Content-Type: application/zip" + crlf + crlf;
var fr = new FileReader(wf_zip_path);
fr.open();
//content += fr.readAll() + crlf;
// content += "--" + boundary + crlf;
// // content += "Content-Disposition: form-data; name=\"categoryId\"" + crlf + crlf;
// // content += System.getObjectId(wf_folder) + crlf;
// // content += "--" + boundary + crlf;
// content += "Content-Disposition: form-data; name=\"overwrite\"" + crlf + crlf;
// content += true + crlf;
// content += "--" + boundary + "--" + crlf;
content = "------WebKitFormBoundary7MA4YWxkTrZu0gW\r\nContent-Disposition: form-data; name=\"file\"; filename=\"com.mayank.emptyPackage.package\"\r\nContent-Type: \"application/octet-stream\"\r\n\r\n" + fr.readAll() + "\r\n------WebKitFormBoundary7MA4YWxkTrZu0gW--";

var req = rest_Host.createRequest("POST", "content/packages", content);
req.contentType = "multipart/form-data; boundary=" + "----WebKitFormBoundary7MA4YWxkTrZu0gW";
req.setHeader("Accept", "application/xml");

var reponse = req.execute();

System.log("URL: " + req.fullUrl + " -> " + reponse.statusCode);
if (reponse.statusCode != 202) {
    System.warn("Error during workflow import.");
    System.log("---- Request ----");
    System.log("URL: " + req.fullUrl);
    System.log("Content:\r\n" + content);
    System.log("");
    System.log("");
    System.log("---Response---");
    System.log("Status Code: " + reponse.statusCode);
    System.log("Content: " + reponse.contentAsString);
    var headers = reponse.getAllHeaders();
    // for each(var k in headers.keys) {
    //     System.log("Header [" + k + "]:" + headers.get(k));
    // }
    throw "Error during workflow import (HTTP Code: " + reponse.statusCode + ")";
}That’s all in this post. Hope you like it. See you on other posts. Thanks a lot.
Discover more from Cloud Blogger
Subscribe to get the latest posts sent to your email.


Import a Package
You can import a package by using the vRealize Orchestrator REST API.
Depending on the library of your REST client application, you can use custom code that defines the properties of the package.
By default, if you import an vRealize Orchestrator package with a duplicate name, the existing package is not overwritten. You can specify whether to overwrite existing packages by using a parameter in the request.
By default, vRealize Orchestrator packages are imported with the variable values of configuration elements. You can import a package without variable values by using a parameter in the request.
By default, tags contained in vRealize Orchestrator packages are imported, but if the same tags already exist on the vRealize Orchestrator server, the values of existing tags are preserved. You can specify whether existing tag values are preserved by using parameters in the request.
Prerequisites
The package binary content should be available as multi-part content. For details, see RFC 2387.
Procedure
In a REST client application, add request headers to define the properties of the package that you want to import.
Make a POST request at the URL of the package objects:
POST https://{orchestrator_fqdn}/vco/api/packages/
(Optional) To import a package and overwrite an existing package with the same name, use the overwrite parameter in the POST request:
POST https://{orchestrator_fqdn}/vco/api/packages/?overwrite=true
(Optional) To import a package without the variable values of the configuration elements from the package, use the importConfigurationAttributeValues parameter in the POST request:
POST https://{orchestrator_fqdn}/vco/api/packages/?importConfigurationAttributeValues=false
(Optional) To import a package without the tags that it contains, use the tagImportMode parameter in the POST request:
POST https://{orchestrator_fqdn}/vco/api/packages/?tagImportMode=DoNotImport
(Optional) To import a package with the tags that it contains and overwrite existing tag values, use the tagImportMode parameter in the POST request:
POST https://{orchestrator_fqdn}/vco/api/packages/?tagImportMode=ImportAndOverwriteExistingValue
Results
If the POST request is successful, you receive the status code 202.
Parent topic: Importing and Exporting Objects