A quick note on the AI: I use Claude throughout this post, so wherever you read “Claude”, read “your AI assistant”. vcf-orchestrator-mcp is a standard MCP server, so it works with any AI tool that supports MCP, such as Claude Desktop, VS Code with GitHub Copilot or Cursor. Pick whichever you like.
Setup and Demo
For a while now I’ve been using AI assistants to write and review Orchestrator code. They’re good at it. But there was always a gap: the assistant could write a script, and then I had to open the Orchestrator client, create the action, paste it in, bind the inputs, build the workflow, run it, read the logs, copy the error back into the chat, and go round again.
So I closed the gap. vcf-orchestrator-mcp is an open-source MCP server that lets Claude work with VCF Operations Orchestrator directly. It can find and read workflows, create and update actions and workflows, run them, follow the execution and read the logs, all through the Orchestrator REST API, from a chat.
In this post I’ll show what it does, how to set it up in a few minutes, how it keeps its login alive without you ever pasting a token again, and a real example from my lab where Claude built a complete VM onboarding solution for VCF Automation 9.1.
What is an MCP server, in one paragraph
MCP, the Model Context Protocol, is an open standard that lets an AI assistant use external tools. An MCP server is a small program that runs next to the assistant (for example Claude Desktop) and offers it a set of tools, like “find workflows” or “run this action”. The assistant decides when to call a tool, the server makes the real API call, and the result comes back into the conversation. Your credentials stay with the server on your machine; the assistant only sees the results.
What vcf-orchestrator-mcp can do
It works with the Orchestrator embedded in VCF Automation 9 as well as a standalone (external) VCF Operations Orchestrator 9.x. There are two layers of tools.
Curated tools for the things you do every day:
| Tool | What it does |
|---|---|
vro_find_workflows, vro_get_workflow | Search workflows by name, read inputs, outputs, schema and scripts |
vro_run_workflow, vro_get_execution, vro_list_executions | Run a workflow with plain JSON inputs, wait for it, read its state, outputs and logs |
vro_find_actions, vro_get_action, vro_run_action | Find, read and run actions |
vro_save_action | Create or update an action (script, inputs, return type) |
vro_save_workflow | Create or update a workflow from a simple JSON spec: script tasks, action calls, decisions, bindings and input defaults |
vro_run_script | Run a quick ES5 snippet on the server and get the result and System.log output back |
vro_set_versions | Set or bump versions on workflows and actions |
vro_delete_workflow | Delete a workflow |
vro_server_info | Check connectivity, version and the auth mode in use |
The whole REST API for everything else. The server ships with the Orchestrator OpenAPI spec (303 operations), and three tools let Claude use any of it: vro_api_search finds the right operation (“package export”, “configuration element”), vro_api_describe shows its parameters and body, and vro_api_call calls it. So packages, configuration elements, resource elements, categories, permissions and the rest are all reachable, even though there’s no dedicated tool for each one.
A few details I cared about as an Orchestrator developer:
- Versions are bumped automatically. Every time Claude saves an action or a workflow, its version goes up (a new one starts at 1.0.0, an update bumps the patch), so you always see what changed.
- Plain JSON in, plain JSON out. You don’t deal with Orchestrator’s typed REST format. Strings, numbers, Properties, arrays, and SDK objects such as a
VC:VirtualMachineor aResourceElementare converted for you. - Self-signed lab certificates are supported with one setting.
Getting started
You need Node.js 18.17 or newer, Claude Desktop, and a VCF Automation org you can sign in to with a local admin user.
1. Install
npm install -g vcf-orchestrator-mcp
2. Run the one-time setup
| Setting | Value in my lab | Where it comes from |
|---|---|---|
| VCF Automation FQDN | auto.vmw.lab | The VCF Automation appliance; embedded Orchestrator 9.1.1 at https://auto.vmw.lab/vco |
| Organization name | vmapps-org | Tenant URL https://auto.vmw.lab/tenant/vmapps-org |
| Local user | admin (logs in as admin@vmapps-org) | The org’s first user, a local user with the Organization Owner role |
| Service account name | Lab-vRO-MCP | Your choice; shown under Access Control > Service Accounts |
| Service account roles | Organization Owner, Orchestrator Administrator | Set with --role, or added later in the UI |
vcf-orchestrator-mcp setup u002du002durl https://auto.example.lab u002du002dorg u0026lt;org nameu003e u002du002duser u0026lt;local adminu003e u002du002dname Lab-vRO-MCP u002du002drole u0022Organization Owner,Orchestrator Administratoru0022 u002du002dinsecure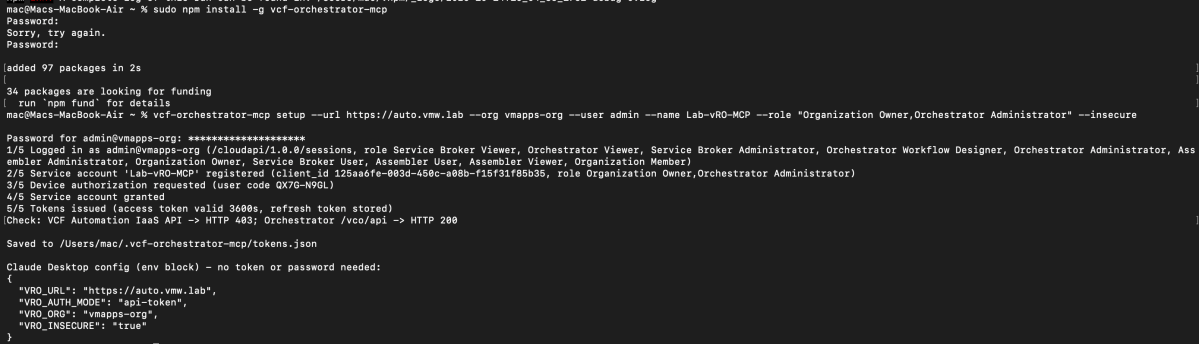
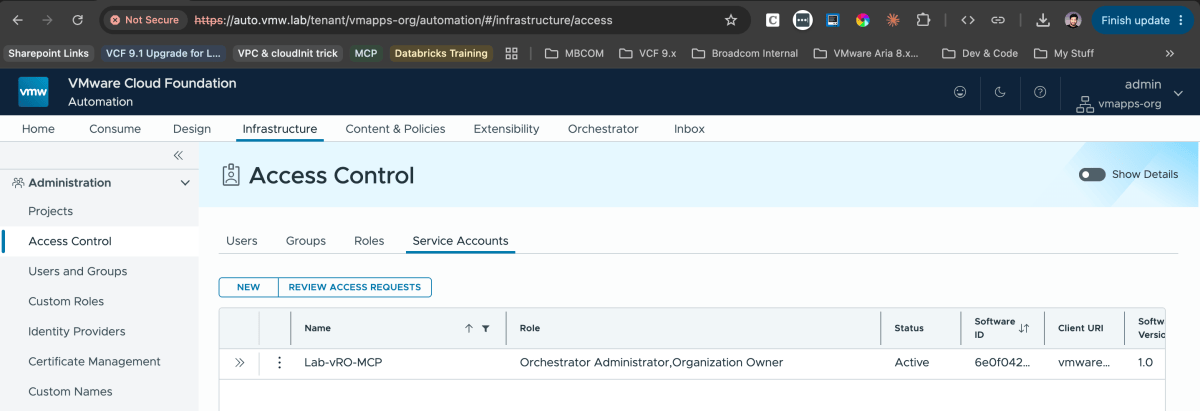
It asks for the password with a masked prompt. The password is used once to log in and is never stored. What each option means:
--org: the organization name, the last part ofhttps://<host>/tenant/<name>. Not the display name, which can be different.--user: a local user of that org with an admin role. You type it without@org.--name: the name of the service account that setup creates. It’s how you’ll find it later under Access Control > Service Accounts, for exampleLAB-Orchestrator-MCP.--role: the roles the service account gets, comma-separated. Include Orchestrator Administrator, otherwise Orchestrator treats the account as a plain user and it won’t see any workflows. If you leave it out, the account gets the same role as the user you log in with.--insecure: accept a self-signed certificate. Drop it if your certificates are trusted.
A successful run looks like this:
Password for admin@vmapps-org: ********************1/5 Logged in as admin@vmapps-org (/cloudapi/1.0.0/sessions)2/5 Service account 'LAB-Orchestrator-MCP' registered (client_id a971c9cb-..., role Organization Owner)3/5 Device authorization requested (user code T5RW-SJQ7)4/5 Service account granted5/5 Tokens issued (access token valid 3600s, refresh token stored)Check: VCF Automation IaaS API -> HTTP 403; Orchestrator /vco/api -> HTTP 200Saved to C:Usersyou.vcf-orchestrator-mcptokens.jsonClaude Desktop config (env block) - no token or password needed:{ "VRO_URL": "https://auto.example.lab", "VRO_AUTH_MODE": "api-token", "VRO_ORG": "vmapps-org", "VRO_INSECURE": "true"}
The final check matters most: /vco/api must return HTTP 200. That means Orchestrator accepts the service account’s token.
3. Add it to Claude Desktop
Open Settings > Developer > Edit Config and add the server with the env block setup printed. There’s no token or password in it:
{ "mcpServers": { "vcf-orchestrator": { "command": "vcf-orchestrator-mcp", "env": { "VRO_URL": "https://auto.example.lab", "VRO_AUTH_MODE": "api-token", "VRO_ORG": "vmapps-org", "VRO_INSECURE": "true" } } }}
Critical Fully quit Claude Desktop (from the system tray too) and open it again.
Then ask: “Run vro_server_info and tell me which Orchestrator I’m connected to.”
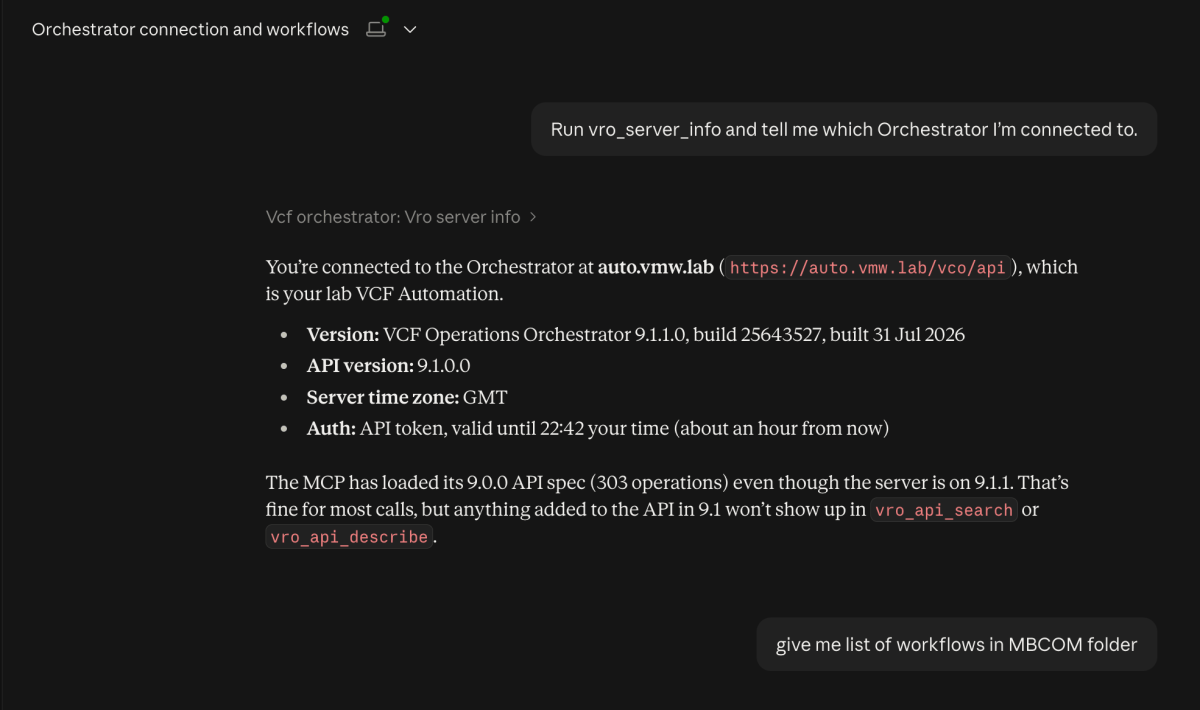
What setup actually does
If you read my earlier post on end-to-end VCF Automation token generation via REST APIs, this will look familiar. Setup runs that same flow for you, in five calls:
- Session login as
user@orgwithPOST /cloudapi/1.0.0/sessions. This is the only step that uses the password. - Register a service account with
POST /oauth/tenant/{org}/register, with the name and roles you chose. - Device authorization with
POST /oauth/tenant/{org}/device_authorization, which returns a device code and a user code. - Grant the user code as the logged-in admin, with
POST /tm/cloudapi/1.0.0/deviceLookup/grant. - Get the tokens with
POST /tm/oauth/tenant/{org}/tokenandgrant_type=urn:ietf:params:oauth:grant-type:device_code. This returns an access token and a refresh token.
The refresh token is saved to ~/.vcf-orchestrator-mcp/tokens.json, together with the service account’s client ID. From now on the MCP server logs in as the service account, not as you.
How the token stays fresh
This was the part that annoyed me most before. Bearer tokens copied from the browser expire after about an hour, so every new session started with “401, paste a new token”. Now nothing needs pasting:
- Before each call to Orchestrator, the server checks its access token. If more than a minute is left, it just uses it.
- If less than a minute is left, it refreshes first:
POST /oauth/tenant/{org}/tokenwithgrant_type=refresh_token, the stored refresh token and the client ID. - VCF Automation returns a new access token (about an hour) and a new refresh token. The old refresh token stops working. That’s refresh token rotation.
- The server saves the new refresh token to the token file straight away, and only then makes your call.
- If a call still gets a 401, for example because the account’s roles changed, it refreshes once and retries.
There’s no background timer. If you don’t use it for a few hours, nothing happens in between; the next call simply refreshes first. After a restart or reboot, the first call reads the newest refresh token from the file and carries on.
Things that tripped me up (so they don’t trip you up)
- Org name vs display name. The Organizations list in the provider portal shows display names. Login needs the actual name. Open the org’s tenant portal and take the last part of the URL.
- Role names differ per org. My first attempt failed with “Unable to find the following role(s) in org …: [Organization Administrator]”. In that org the admin role is Organization Owner. Setup now defaults to your own role, and you can always pass
--role. - No workflows visible? If the MCP connects but lists no workflows, not even the library, the service account is missing the Orchestrator Administrator role. You can add roles to the service account afterwards in Access Control > Service Accounts.
- Restart after a role change. An access token carries the roles it was issued with. After changing roles, restart Claude Desktop so the server fetches a fresh one.
- Account lockouts. Repeated failed logins lock a local user. Setup stops at the first 401, so a typo costs you one attempt, not several.
- SSO-only users can’t log in with a password over the API. Create the service account in the UI instead and run
setup --url ... --org ... --client-id <its client ID>. Setup prints a code, you grant it under Review Access Requests, and setup finishes by itself.
Running it day to day
- One service account per machine. Don’t copy
tokens.jsonto a second PC. Because of rotation, whichever machine refreshes first invalidates the other’s copy. Run setup on each machine instead. - Revoking access is one click: delete or disable the service account in VCF Automation, and the MCP stops working immediately.
- If the chain ever breaks (the account revoked, the file deleted), the error tells you so, and you simply run setup again.
- Treat the token file like a password. The refresh token can do whatever the service account’s roles allow. Give each environment its own account with only the roles it needs.
- This is full access. Claude can create, change, run and delete content. Start in a lab, and keep Claude Desktop’s tool approval prompts on, so you see each change before it happens.
What’s next
Orchestrator was the first step. Next I’m working on the VCF Automation side, so Claude can also work with projects, templates, deployments and day-2 actions directly, using the same service account and the same setup.
vcf-orchestrator-mcp is free and open source. Give it a try in your lab, and if something doesn’t work or you’d like a tool added, open an issue on GitHub or leave a comment below.
Other VCF MCP Projects
- VCF Operations: vmware-skills/VMware-Aria: VMware Aria Operations monitoring, alerting, and capacity planning — MCP tools for AI agents
- vCenter & ESXi Monitoring: vmware-skills/VMware-AIops: VMware vCenter/ESXi AI-powered monitoring and operations. Two skills: vmware-monitor (read-only, safe) and vmware-aiops (full operations) | Claude Code Skill
- vCenter Read-only Monitoring: vmware-skills/VMware-Monitor: Read-only VMware vCenter/ESXi monitoring — code-level enforced safety, zero destructive operations
- VKS: vmware-skills/VMware-VKS: MCP Skill + CLI for vSphere with Tanzu (VKS) — Supervisor, Namespace, and TanzuKubernetesCluster lifecycle management. Requires vSphere 8.x+.
- vRO: https://github.com/imtrinity94/vcf-orchestrator-mcp
- VCF AI Hub: VCF Agentic AI Hub (Code Assist) MCP Server Fling
Discover more from Cloud Blogger
Subscribe to get the latest posts sent to your email.